Grooming Table Hardware • No-Sit Devices • Grooming Restraint • Belly Straps • Clipper Finish • Positioning Equipment Review
No-Sit Grooming Post: Why I Do Not Like a Strap Sitting Right in the Clipper Runway
What I do not particularly like about this device is where it connects.
It straps over and around the dog just behind the shoulders. That may help stop sitting, but it puts the device directly across one of the worst possible grooming areas to interrupt.
Most groomers, myself included, like to start the clippers somewhere toward the base of the neck and make a smooth continuous run down the back to the base of the tail.
With this device in place, you have to start above it, stop, go around it, and then continue. In my experience, stopping and starting in this area tends to make a groom look choppy.
That is the problem. This device may be trying to prevent sitting, but it parks itself right in the clipper runway.
⚠️
Operator rule
A no-sit device is not automatically useful just because it stops sitting. If it creates lumps, depressions, bunched coat, awkward clipper starts, and table clutter, it may solve one problem while making the finish worse.
🗺️
Use This Page Like a Device Reality Check
This page is about why this particular no-sit device creates grooming-finish and workflow problems for me.
🧰
What It Tries To Do
The device is meant to stop the dog from sitting, but the placement creates other problems.
✂️
Clipper Runway Problem
The strap lands where the groomer wants a clean run from neck to tail.
🌾
Coat Direction
Shoulder and rib coat needs to lie naturally. Bunched coat cuts wrong.
⛰️
Hilly Terrain
The image shows lumps, depression, and bunched fur right where the clippers need a smooth surface.
🪢
Belly Strap Comparison
A simple belly strap can often be moved with two fingers while the groomer keeps working.
💵
Current Market
No-sit restraints range from cheap haunch holders to expensive positioning systems.
✅
Operator Verdict
I tried it, found it cumbersome, and went back to the belly strap method.
❓
FAQ
Strap placement, choppy clipper work, coat bunching, belly straps, and whether some groomers may still like it.
🧰
What the No-Sit Grooming Post Is Trying To Do
It is trying to stop the dog from sitting by placing a support/restraint strap behind the shoulders.
The idea behind the no-sit grooming post is easy enough to understand. The dog wants to sit. The groomer wants the dog standing. The device straps around the dog and helps prevent the dog from dropping its rear end while the groomer works.
I understand the goal.
Sitting can be aggravating, especially during undercarriage work, sanitary work, rear-leg work, or any task where the groomer needs the dog standing long enough to finish the job cleanly.
But the way a device solves the problem matters.
This no-sit post solves the sitting problem by putting a strap over and around the dog just behind the shoulders. That is exactly where I do not want extra hardware when I am trying to clip a clean body line.
That is why I do not particularly like this device. It may help hold the dog up, but it gets in the way of the groom.
📌
Main distinction
This is not a general complaint that all support is bad. Support is useful. The problem is putting the support strap directly across a high-visibility clipping area.
🚧
Why I Do Not Like Where It Straps
The strap lands across the shoulder, hackle, and upper-rib area where the coat needs to lie naturally.
What I do not particularly like about this device is that it connects or straps over and around just behind the shoulders.
The reason being that most groomers, myself included, like to start the clippers somewhere toward the base of the neck and make a smooth continuous run down the back to the base of the tail.
That area matters. It is not some hidden part of the dog that nobody will see. It is the top line, shoulder transition, hackle area, front rib area, and the beginning of the visual flow down the body.
If the strap lands there, the groomer now has to work around it.
That means starting above it, stopping, going around it, restarting, blending, correcting, and hoping the finished coat does not show the interruption.
In my experience, stopping and starting in this area tends to make a groom look choppy.
⚠️
Finish-quality warning
A device can be mechanically useful and still be a bad grooming choice if it interrupts the clipper path in a high-visibility coat area.
✂️
The Clipper Runway Problem
The device parks itself right where I want one smooth continuous clipper motion.
With this device in place, you would have to start above it, then stop, go around it, and then continue.
That is not how I want to work this part of the dog.
When clipping from the base of the neck toward the tail, the goal is a smooth, continuous motion. The fewer interruptions, the better. The fewer stop marks, angle changes, pressure changes, and re-entry points, the better.
The shoulder and back line are not forgiving areas. A rough start, uneven pressure, or awkward restart can show up in the finished groom.
The no-sit grooming post puts a strap across that runway.
That means the groomer has to break the line, move around the hardware, and try to make the finish look like none of that happened.
Sometimes you can blend around problems. That does not mean I want to create the problem on purpose.
Swipe left/right to see the full table.
| Grooming Area | What the Groomer Wants | What the Device Creates | Operator Take |
|---|---|---|---|
| Base of neck | Clean starting point for body clipping. | Strap interference near the start of the run. | Bad place to force a stop. |
| Shoulders | Smooth transition over the dog’s structure. | Bunched coat and strap depression. | High-risk area for choppy finish. |
| Hackles | Natural coat lay and even clipping pressure. | Raised hair around the device. | Hair can be cut too short when standing up. |
| Front ribs | Coat flowing backward and down. | Strap changes coat direction and body contour. | This is not a clean canvas. |
| Back line to tail | One smooth continuous run. | Start, stop, skip, restart. | More work for a worse chance at a clean finish. |
🌾
Coat Direction, Bunched Hair, and Choppy Starts
The dog’s coat needs to lie naturally. The strap makes it stand, bunch, dip, and lie wrong.
The disputed area, the shoulders, hackles, front of ribs, and similar areas, generally consist of long hairs that flow backwards toward the tail and downwards at a 45-degree angle off the ribs toward the lower chest and belly.
These are areas that, while clipping, you want to be able to trim in one smooth continuous motion in order to get the desired look.
With this item, the hairs around it are all bunched up.
If you come too close from the neck area, the hairs around it will get cut too short because they are standing and not lying naturally with the body.
The same applies for the hairs directly after the strap.
This is not a small detail. Coat direction is part of grooming. Clipper work depends on what the hair is doing when the blade touches it.
Hair that is lying naturally cuts one way. Hair that is lifted, bunched, smashed, folded, or standing because a strap is pulling the skin and coat around it cuts differently.
That is how a device that looks harmless in a product photo can create a finish problem on the table.
📌
Coat lesson
If the device changes how the coat lies, it changes how the coat cuts. That is why strap placement matters.
⛰️
The Hilly Terrain Problem
When grooming, I want as smooth a canvas as possible. This device creates hills and valleys.
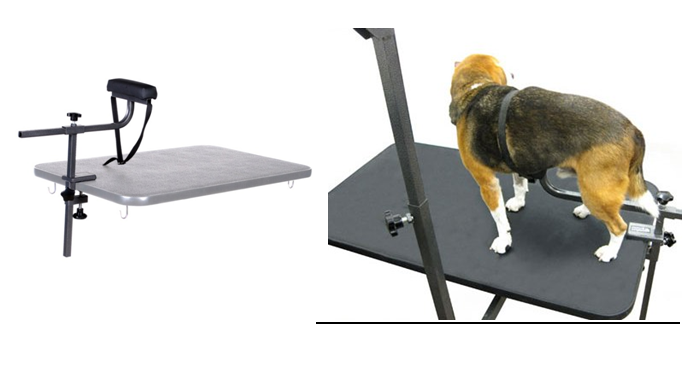
If you look at the image above, you can see the hilly terrain created by this device as it attaches to the animal’s body.
Look and you will see the big lump of skin and fur in front of the device directly below the neck, the depression where the device wraps around the dog, and another lump of skin and fur directly after the device.
When grooming, you want as smooth a canvas as possible to work with in order to get the best look possible.
This device does the opposite. It creates a lump before the strap, a valley under the strap, and another lump after the strap.
That means the clippers are no longer traveling across a natural body surface. They are traveling across raised coat, compressed coat, and disturbed coat.
Grooming clippers are not a dune buggy; therefore, I do not want to have to go Baja-ing over hills and through valleys when grooming a dog if at all possible.
⚠️
Visual inspection
Look at the device placement before buying into the idea. The problem is visible: lump, depression, lump. That is not the smooth grooming surface I want under my clippers.
🔄
The Repositioning Problem
With a belly strap, I can move the strap. With this device, I have to move the dog.
Another drawback to this item is that you have to move the dog about and cannot readily move just the strap.
When using a standard grooming arm with a belly strap, I can simply slide the strap forward or backwards to work around it without losing any lifting advantage it is applying to the dog.
This can generally be accomplished with a couple of fingers on one hand while steadily operating the clippers with the other hand.
That matters because it keeps the groom moving. I do not have to stop the clipper line, set the clippers down, reposition the animal, reset the device, and restart the work.
With this device, I would have to sit the clippers down, reposition the dog within the device so that the strap is either above or below where it was previously, and then start again.
That is not just slower. It also creates more chances for uneven transitions, lost rhythm, dog movement, coat disruption, and a groom that looks like the equipment was making decisions.
🪢
Belly Strap vs. No-Sit Grooming Post
This is why I usually prefer the simple belly strap method.
This device is exactly why I normally prefer a simple belly strap.
A belly strap can give the dog support without planting a bulky device across the shoulder and hackle area. It can usually be slid forward or backward as needed. It does not require the same amount of dog repositioning. It is cheaper, simpler, easier to store, and easier to understand.
If the dog is older, weak, sore, or otherwise infirm, I can fold a hand towel under the belly area first and then place the belly strap over that to make the support more comfortable.
That gives me what I actually need: enough support to keep the dog workable without creating a major obstacle in the coat.
Swipe left/right to see the full table.
| Issue | Simple Belly Strap | No-Sit Grooming Post | My Take |
|---|---|---|---|
| Table space | Minimal extra hardware. | Adds another device to the table. | Table space is already tight. |
| Adjustability while working | Can often slide forward or backward with a couple fingers. | Usually requires repositioning the dog inside the device. | Belly strap wins for flow. |
| Clipper path | Easier to move out of the way. | Sits across the shoulder/hackle clipper runway. | Bad location for finish work. |
| Coat disruption | Less bunching when used properly. | Creates lumps, depression, and bunched hair. | Smooth canvas matters. |
| Storage | Small, easy to hang or keep nearby. | Another specialty item to store. | Devices that are rarely used become clutter. |
| Comfort options | Easy to pad with a towel for older or infirm dogs. | Depends on device shape and placement. | I like simple padded support. |
📌
Practical preference
A belly strap is not glamorous. It just solves the problem without turning the shoulder area into an obstacle course.
💵
Current 2026 Market Snapshot and Buying Reality
The price spread is wide because sellers mix simple haunch holders, arm kits, no-sit posts, and full positioning systems into the same general conversation.
Current no-sit and positioning-device pricing depends on what you are actually buying.
Simple no-sit haunch holders and basic body-restraint loops can be inexpensive. Current examples commonly show basic no-sit restraints around the $12 to $15 range.
Basic grooming arm kits that include a clamp, post, noose, and no-sit haunch holder can show up around the $38 to $45 range, with some imports and expanded kits priced higher depending on seller, hardware, size, and included parts.
More serious positioning systems are a completely different purchase. Starter handling-assist systems can be around the $160 range, while professional multi-part systems can run roughly $420 to $480.
That means cheap is not the issue here.
A $12 or $40 device is still too expensive if it gets in the way, makes the groom look choppy, lives in a drawer, or creates table clutter that staff hate working around.
On the other hand, a more expensive system may be worth money if it solves a real handling problem, improves safety, and fits the groomer’s workflow. The point is not “cheap bad, expensive good.” The point is whether the tool earns its place on the table.
Swipe left/right to see the full table.
| Current 2026 Buying Category | Typical Price Reality | What You Usually Get | Operator Take |
|---|---|---|---|
| Simple no-sit haunch holder | About $12–$15 | Basic restraint loop or haunch holder meant to discourage sitting. | Cheap enough to try, but still has to beat a belly strap. |
| Grooming arm kit with no-sit holder | About $38–$45 for many basic kits | Clamp, arm, loop/noose, and no-sit holder bundled together. | Useful only if the hardware is strong and the restraint setup fits your table. |
| Expanded/imported no-sit arm kit | About $80–$110 in some listings | Taller arms, more included loops, clamps, or added positioning pieces. | Price does not fix awkward strap placement. |
| Starter handling-assist system | Around $160 | More structured restraint and positioning support. | Compare as a handling system, not as a simple no-sit strap. |
| Professional positioning system | Around $420–$480 | Multi-part professional restraint and positioning setup. | This is serious system money. It needs to solve serious workflow or safety problems. |
⚠️
Price warning
Do not let a low price trick you into buying table clutter. A cheap device that damages the groom, interrupts clipper flow, or never gets used is not a bargain.
🤷
When a Groomer Might Still Like This Device
Some groomers will swear by it. That does not mean it fits my workflow.
As with any grooming item, some groomers will swear by this thing and tout it as the next best thing since sliced bread.
Fine. If a groomer uses this device every day, gets clean results, avoids choppy finishes, controls the dog well, and likes the workflow, then that groomer has a system that works for them.
I am not trying to outlaw the thing.
But for me, the device creates problems in the exact areas where I want the dog smooth, the coat natural, and the clipper path uninterrupted.
A groomer doing certain tasks, certain coat types, certain trims, or certain shop-style work may not care as much about the shoulder/hackle interruption. A groomer using it only for limited undercarriage or quick maintenance work may also be less bothered by it.
That is a different use case than clipping clean body lines and trying to make the finished groom look smooth.
👀
My Actual Experience With This Device
I watched it used, tried it, found it cumbersome, and went back to the simple method.
As for me, I have seen it in operation once with a groomer I hired.
I watched her use it. I tried it. I found it to be cumbersome.
I then showed her how to properly use a belly strap and never saw it again.
That is about as clean a field test as I need.
The device did not make the work feel easier. It did not make the table feel cleaner. It did not make the clipper path better. It did not make me think, “Wonderful, finally a better way to put extra hardware right where I want to groom.”
It made me want the belly strap.
📌
Field verdict
I am not basing this on a catalog photo. I watched it used, tried it, and found the belly strap simpler and more practical.
✅
My Operator Verdict on the No-Sit Grooming Post
I do not like the strap placement, I do not like the clipper interruption, and I prefer the belly strap.
My verdict is that I do not particularly like this device.
The main reason is strap placement. It connects just behind the shoulders, right across the area where many groomers want to start the clippers near the base of the neck and continue smoothly down the back toward the tail.
With the device in place, the groomer has to stop, work around it, restart, and deal with the coat disruption it creates.
The shoulder, hackle, and front rib areas are not throwaway areas. The hair flows backward toward the tail and downward toward the lower chest and belly. That hair needs to lie naturally for the clippers to cut cleanly.
This device bunches the hair, creates lumps before and after the strap, and depresses the coat where it wraps around the dog.
Grooming clippers are not a dune buggy. I do not want to go Baja-ing over hills and through valleys if I can avoid it.
The second problem is workflow. With a belly strap, I can usually slide the strap forward or backward with a couple fingers while keeping support on the dog. With this device, I have to stop, set the clippers down, reposition the dog, move the device relationship, and start again.
Some groomers may love it. I do not. I watched it used, tried it, found it cumbersome, showed the groomer how to use a belly strap properly, and never saw it again.
⚠️
Final take
This device may prevent sitting, but for my workflow it creates too much trouble in the shoulder and back clipper path. I would rather use a simple belly strap and keep the grooming surface cleaner.
❓
No-Sit Grooming Post FAQ for Grooming Rooms
Straight answers about strap placement, clipper finish, coat direction, belly straps, table clutter, and buying judgment.
What does the no-sit grooming post try to do?
It tries to prevent the dog from sitting by using a strap or support point behind the shoulders and around the body.
Why do I not particularly like it?
I do not like where it straps. It lands just behind the shoulders, which is right where I want smooth clipper movement from the base of the neck down the back.
Why is that area so important?
The shoulder, hackle, and front rib area is a visible coat area where the hair flows backward toward the tail and downward off the ribs. Interruptions there can make the finished groom look choppy.
What happens to the coat around the strap?
The strap bunches the coat, lifts hair out of its natural lay, creates a depression under the strap, and creates lumps before and after it. Hair that is standing or bunched can cut too short or unevenly.
Why is stopping and starting with clippers a problem?
Stopping and restarting in a high-visibility body area can leave uneven transitions, pressure changes, and choppy-looking clipper work.
Why do I compare it to hilly terrain?
Because the device creates a lump, a valley, and another lump where I want a smooth grooming surface. Grooming clippers are not a dune buggy.
Why do I prefer a belly strap?
With a belly strap, I can usually slide the strap forward or backward with a couple fingers while keeping support on the dog. It is simpler, easier to move, easier to store, and less disruptive to the clipper path.
Can some groomers still like this device?
Yes. Some groomers may swear by it, especially if it fits their trim style, dog mix, or specific workflow. I tried it and found it cumbersome.
What current price range should I expect?
Simple no-sit haunch holders may be around $12 to $15. Basic grooming arm kits with no-sit holders may be around $38 to $45. Larger professional positioning systems can run from around $160 to several hundred dollars.
What is the main lesson?
Do not judge a no-sit device only by whether it stops sitting. Judge whether it improves the groom without creating coat disruption, table clutter, awkward repositioning, and choppy clipper work.
🐾
Bottom Line: I Would Rather Use the Belly Strap
This device solves sitting by creating problems in the coat area where I want the smoothest clipper work.
I do not particularly like the no-sit grooming post because it straps just behind the shoulders.
That is exactly where many groomers want to start the clippers near the base of the neck and make a smooth continuous run down the back to the base of the tail.
With this device, the groomer has to stop, go around it, restart, and then deal with the coat that has been bunched, lifted, depressed, and disturbed by the strap.
The shoulder, hackle, and front rib area needs smooth coat lay and smooth clipper movement. This device creates hilly terrain instead.
It also makes repositioning harder. With a standard grooming arm and belly strap, I can often slide the strap with a couple fingers while keeping support on the dog. With this device, I have to stop, set the clippers down, move the dog, move the device relationship, and start again.
Some groomers may love it. I watched it used, tried it, found it cumbersome, showed the groomer how to properly use a belly strap, and never saw it again.
That is my answer: belly strap first.